Processing and Publishing Text Data
The third theme is about managing and publishing text-formatted data. Skills pertaining to word processing, document’s text design and publishing via various mediums are somewhat necessary in the academic and professional life of higher education students.
Theme 3 includes three assignments (A7, A8, and A9). Programs used during the course are Microsoft Word and publishing software such as Blogger, SlideShare, and Dropbox. Deadlines for the exercises are definitive and non-negotiable. You can check them in the schedule.
It is recommended to start with assignment 7, especially if word processing is new to you. If you feel comfortable with the theme’s topics, feel free to choose the exercises that interest you the most. Make sure you get enough points to pass the third theme, as specified in the completion requirements.
Table of Contents
- Text-Formatted Data
- Character, Paragraph, Section, and Whole Document
- Selecting Text
- Paragraph Styles
- Table of Contents, Header and Footer, and page numbering
- Ruler and Tab Use
- Instructions Elsewhere Online
Lecture Notes (in Finnish only)
Exercise 7: Processing Text Data
Lecture Notes (in Finnish only)
Exercise 8: Word Processing Continued - Online Publishing
Lecture Notes (in Finnish only)
Exercise 9: Online Publishing
1. Text-Formatted Data
Text-formatted data refers here to digital information produced in natural language such as reports, essays, poems, writings, or articles. There are specific tools for word processing that support grammar, layout, readability, and publishing. The best known of these is Microsoft Word. Understanding the tools and the nature of text data is useful not only when creating and editing text documents but also when analyzing them.
Word and its file types .docx (new) and .doc (old) have become synonymous with word processing since the 90’s. Word’s file types are often called documents and they can include content outside of text; a wide variety of graphic designs, images, and possibly video and audio. Like Excel’s .xlsx files, docx files can include macros, or, embedded widgets. Other text file types include: .txt, which contains unformatted text such as Notepad’s own file format , basic text formatted text .rtf, such as WordPad’s own file format, and .odt, the file type for OpenOffice and LibreOffice. All these file types can be opened in Word and it is also possible to save documents as these file types, but when working with file types it is usually best to keep .docx in order to save the work exactly as you intended.
Text-formatted data is often used to improve readability and aesthetic appeal. As with previous themes, this theme focuses on technical work rather than creativity. Although the content itself is often more important than its format, it is worth investing in appearance and readability. We live in a time filled with information and high quality content, a document with awkward language and formatting often goes unread.
2. Character, Paragraph, Section, and Whole Document
Text is formatted in four different units of measure: character, paragraph, section, and whole document.
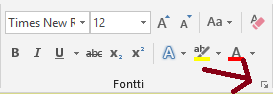 The character formatting tools in Word can be found on the ‘Home’ tab in the ‘Font’ tool group. For example, the accentuating ways of bold, italic, underline, and
 strikethrough are character formatting tools. The most common text formatting commands are visible, the full selection can be found by clicking the little arrow in the lower right corner (picture on the left).
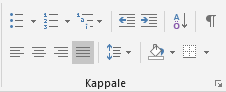 The command buttons for pharagraph formatting are on the ‘Home’ tab in the ‘Paragraph’ tool group. Some basic concepts of paragraph formatting are alignment, indent, line spacing and empty space after (or before) paragraphs. You may see people separate paragraphs incorrectly by pressing the Enter key multiple times to achieve the spacing they desire. The same way people tend to use the space key to create indents. Enter is (only) for paragraph replacement and space is (only) for separating words. Extra paragraph breaks and spaces expose to typographical errors and make computer more difficult to read. These and other non-print characters can be displayed and edited with the ¶ command button.
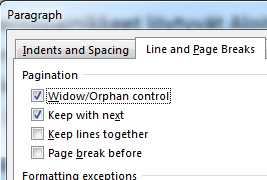 In addition to alignment, indentation, line spacing, and paragraph space after paragraphs, you can define widow and orphan line blocking and binding to the next paragraph. The widow line is a single line at the bottom of the page. ‘Keeping with the next paragraph’ refers to those paragraphs that are bound together and display on the same page. In word processing programs, headings are considered as paragraphs and the ‘keep with next’ applies to them by default. To block and bind individual lines, you can manually define Home / Paragraph / (corner arrow) / Line and Page Brakes. In the picture at the top left, both widow/orphan blocking and paragraph binding are selected. This applies to the area that is selected or to the paragraph where the cursor is located.
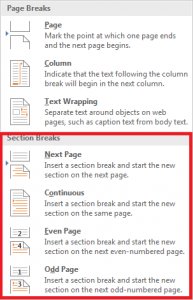 A section is the most unknown of the formatting units. It is often needed when you want to have different headers and footers in the same document, or when you want the document to have both vertical and horizontal pages. Adding a section doesn’t have its own tools other than the tools for changing sections found in the ‘Layout’/Breaks’ menu. The break appears where the cursor is located. The first option (picture on the left) adds a section break and starts a new section on the next page. The second option adds a break and starts the next section on the same page. The two lower options allow you to define different sections for odd- and even-numbered pages – this is useful if you are printing a job as a book or a booklet.
Formatting applied to the whole document includes, for example, margins settings, orientation, size, and columns. They can be defined on the ‘Layout’ tab in the Page Setup group (picture on the right) and by clicking on the small arrow in the corner. The margins define the boundaries of the document’s content area in relation to the paper size (so-called printing-edges). They are 2,5 cm on both sides and 2 cm at the top and the bottom by default. Orientation options are portrait and landscape with several sizes, A4 by default.
3. Selecting Text
There are several ways to select text. Word understands grammar and sentence structures, which helps when you want to select a sentence or a paragraph. Word processing follows the same logic as spreadsheet computation: selecting an object, selecting a tool, and performing an operation.
Selecting a text area. Any part of text can be selected using the keyboard or mouse. When using the keyboard, first move the cursor to the beginning of the area you want to select, hold down the Shift key and move the cursor where you want it with the arrow keys. Release the Shift key when you’re done selecting the desired area. When using the mouse, move the cursor to the beginning of the desired area, hold down the left mouse button and drag the mouse to the end of the area. Release the mouse button once you’re done selecting area.
Selecting an area containing text (line breaking selection). Hold down Alt. Move the mouse cursor to the upper left corner of the area you want to select and hold down the left mouse button. Drag the mouse to the lower right corner of the area and release the mouse button when the selection is done. Release Alt.
Selecting a line. Move your mouse to the left side of the text, near the text, and the cursor changes to a tilted arrow, and then click. If you want to select more than one line, hold down the mouse button and drag your mouse up or down.
Selecting a word. Double click a word.
Selecting a paragraph can be done in several ways: (1) triple-click any word in a paragraph; (2) move your mouse cursor to the left side close to the text and double-click when the cursor turns into a tilted arrow; (3) move the cursor to the beginning of a paragraph (either with the keyboard or the mouse) and press Ctrl+Shift+downward arrow key.
Selecting a sentence. Hold down Ctrl while clicking with the mouse.
Selecting multiple areas. You can add new areas to the selection by holding down the Ctrl key while making new selections.
Selecting the entire document. You may wish to apply commands to the entire document sometimes. You can always select text by dragging and dropping the text from the beginning to the end of the document, but more conveniently by triple-clicking on the left margin. The combination of Ctrl+A selects the entire document (you can also find the command Select All in the menu) as well.
4. Paragraph Styles
In Word, text always has a paragraph style. If you start typing text in a blank document without any preparation, the paragraph style is probably Normal. As you learn in chapter 2, you can edit active paragraphs, such as indentation, alignment or line spacing, with the ‘Paragraph’ tool group. However, in a longer text it is better to customize the paragraph with the ready-made paragraph styles, especially if the writing has a formal or semiformal nature. Once paragraph styles are defined for document’s parts through paragraph styles, style definitions can be changed for the entire document by modifying paragraph styles – not each paragraph individually. Other features such as Table of Contents can also be created and updated automatically. The tool group ‘Styles’ is found on the ‘Home’ tab.

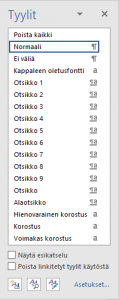 Some of the styles are displayed as shortcuts in the tool group – in the picture above, e.g. Paragraph, Heading 1, and Heading 2 (selected in the picture) *(picture is in Finnish) are shortcut styles. To view the styles (picture on the right) click the arrow at the bottom. There are dozens of ready-made styles and you can create new ones yourself. All styles have default settings that define the font size, colour, line spacing, alignment, and paragraph binding. These settings can be customized by right-clicking on the name of the style and then selecting Edit… . When you edit a paragraph style, all of the paragraphs defined by the style are modified accordingly.
If you want to create your own paragraph style, click the More arrow (![]() ) in the shortcut style tool group (picture above) and select Create style, or click the New Style (picture on the right) in the style panel (
) in the shortcut style tool group (picture above) and select Create style, or click the New Style (picture on the right) in the style panel (![]() ). Self-created styles can be customized afterwards. However, it is noteworthy that they aren’t saved on the computer lab’s computers or on any other computers in public use.
). Self-created styles can be customized afterwards. However, it is noteworthy that they aren’t saved on the computer lab’s computers or on any other computers in public use.
The ‘Design’ tab contains a set of pre-made and matching sets of paragraph styles grouped into different themes. Once the content of your document is defined in paragraphs styles, creating a new look is quick. In addition to individual styles, you can save paragraph style sets (file type .dotx) and Office themes (.thmx). Many larger organizations have document templates and Office themes defined by their own colors and settings.
5. Table of Contents, Header and Footer, and Page Numbers
Table of Contents. When document content is properly defined through paragraph styles (for example, titles with title styles), creating a table of contents is straightforward. Place the cursor in the document where you want the table of contents to be, and select a ready table of contents style from the Table of Contents submenu on the ‘References’ tab. Alternatively, You can customize your own table of contents style by selecting Insert Table of Contents…, (picture on the left). In the pop-up dialog box select the Table of Contents tab and after selecting the style settings, press OK. To update an automatically created table of contents, simply right-click the Update Field in the context menu or refresh table on the ‘References’ tab. This will automatically update the titles and page numbers of the table of contents.
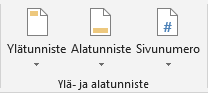 Headers and footers. Create headers and footers using the ‘Header & Footer’ tool group on the ‘Insert’ tab (picture on the left). There are a number of ready-made templates available for both headers and footers, but choosing the right one is not necessary as you can customize everything afterwards. Header and Footer Tools are used in the process of editing (picture below). They can be used to edit the structure (1 and 2), the page number (3), enter the date and time (4), and to determine whether the header and footer is linked in the same style as the previous page header/footer which is the case by default (5). If you want your pages to have different headers or footers you have to separate your document with section breaks (chapter 2) and also unselect Link with Previous.

Page numbers. Add page numbers using the Header & Footer Tool group. The page number can be set either at the top, at the bottom, at the side of the page or where the cursor is (Current position). You can set different styles for the page number via the ‘Format Page Numbers…’ menu; to do this, first add the page number and then do the formatting.
6. Using the Ruler and Tabs
Indentations are done either by editing the paragraph directly or by editing the paragraph style, not with spaces. Sometimes, in addition to indentation, it is necessary to arrange the words in the lines of a document at specific places and tabs are required. Tabs are most easily adjusted using the Tabs tool in Paragraph toolbar.
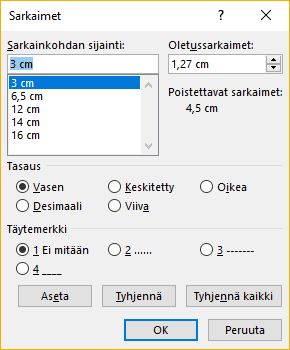 The ‘Tabs’ toolbox looks like the picture on the left. To set tab positions enter a point (in centimeters), select an alignment and press OK. The picture shows the tabs at 3cm, 6.5 cm, 12 cm, 14 cm, and 16 cm. As the name implies, the left tab aligns content to the left, the middle tab to the middle, and right tab to the right. The decimal tab aligns content according to the decimal, and the dash tab creates a vertical line at the specified point. To delete a tab select the tab and click Clear.
The tabs defined in the picture above are shown with a ruler as shown below .They can be removed by dragging the mouse. Note that the changes you make will only affect the active paragraph or more if they are selected when you make changes.
![]()
7. Instructions Elsewhere Online
Microsoft’s Word help center
Lecture Notes: in Finnish
Exercise 7: Processing Text Data
Material for Exercise 7Lecture Notes: in Finnish
Exercise 8: Text Processing Continued
Material for H8
8. Online Publishing
Online publishing refers to making digital information such as text, documents, images and videos available to others via the Internet. Document sharing via the web was already practiced in Theme 1 and can be considered as publishing online.
The development of cloud services and social media in particular, has made online publishing easy, not to mention due to its advertising based nature has made it free or at least inexpensive. For many ordinary consumers publish online for example through Instagram, Flickr, or YouTube, can be almost a daily hobby. Documents can be shared relatively straightforward via cloud disks like OneDrive, Google Drive, DropBox, or iCloud. More specialised services like SlideShare for presentation graphics and issuu booklet-folded media. For blogging there are e.g. Blogger and WordPress. For collaborative publishing there are, for example, wiki-sites. All these services have in common not only relative ease but also the fact that their basic versions are free to the consumer.
The essential question in online publishing is who publishes and to whom. What matters are both the file format (e.g. image, video, presentation, document) and content (work content vs. hobby publication). To whom matters when deciding who gets to see your content, and whether you just share your content or if you should include group editing and commenting rights. Most tools let you set a post public (visible to all) or share it with a link, at least. Some have the option to limit access only to the members of your organization (such as the University’s OneDrive). The good news is that consumers have many options and many right choices. Finding the best solution for your purposes requires some experimentation. In the final part of Theme 3 we do just that – try out different online publishing tools.
Lecture Notes: in FInnish
Exercise 9: Online Publishing
Example pptx-presentation