Office 365 and Data Management
This first set of lectures and exercises focuses on the University’s IT services, data management, information security and essential programs needed for studying – mainly the Office 365 package. Office 365 and other Microsoft products are widely used and their proper usage is often essential in a work environment.
This theme consists of a starting lecture, additional lectures, three assignment (A1, A2 and A3) and a short Moodle-course on information security. University’s computer labs will be introduced to you by the first theme’s assignments as well. While doing the assignments, you will learn to use the following programs: Office 365 (Outlook, One Drive, OneNote and calendar), Microsoft Word and the online learning environment Moodle. Assignment deadlines are definitive and non-negotiable. You can find them in the schedule.
If you are unfamiliar with Office 365 or the University’s IT services, we recommend that you start by doing the assignment 1. If you feel you are familiar with the theme’s topics, feel free to choose the assignment that interest you the most. Keep in mind that you will need to get enough points to pass the first theme, as previously mentioned in the section of completion requirements.
Table of Contents
-
- The Start and the IT Environment at the University
Lecture Notes - Information Security and Data Protection at the University
Lecture notes (in Finnish only)
Inforation security course (Moodle link) - Computers and Operating Systems
- Moodle
- Office 365
Lecture Notes (in Finnish only)
Assignment 1: Office 365 I
Assignment 2: Office 365 II - Data Management in a Team
- Compressing Data
Assignment 3: Teamwork
- The Start and the IT Environment at the University
1. The Start and the IT Environment at the University
Lecture Notes (pdf) in Finnish only
IT Administration Services
The IT Administration is responsible for the University’s IT environment: the equipment, programs and online services provided to the students excluding library services and a few other services. Information on the IT administration’s services and contact options are provided at http://www.uta.fi/it-helpdesk/en. The most important services provided are:
- User accounts
- Key cards
- Electronic Exam service
- Moodle
- Computer labs
- Software distribution
At the Main Campus the Computer labs are situated:
- In the Main Building in rooms D210 (also known as ML 3), D208 (ML 5), and A203 (ML 10)
- In Pinni A in rooms A3110 (ML21) and A4103 (ML30)
- In Pinni B in roomsB0040 (ML40) and B1084 (ML 1084)
- In Tietopinni in rooms B0081 (ML 1), B0089 (ML 7), and B0090 (ML 8)
- In Virta in room 123 (ML 53)
- In Linna in rooms K114 (ML 50), K115 (ML 51), and K117 (ML 52).
At the Kauppi Campus the computer labs are situated in the Arvo-building in rooms F120(ML 72) and A309 (ML 71).
All computer labs can be entered using your key card and the equipment is accessible via your user account. Students can use the labs during the building’s opening hours. In addition, 24/7 access is provided to the labs ML1, ML7 and ML8 in Tietopinni. Some of the computer labs are used for teaching. During those lessons they are reserved only for the students of that particular course. Reserved lessons are marked on the schedule on the classroom door.
The operating systems of the lab computers are either Windows 7 or Windows 8 depending on the lab. The computers have all the programs used during the course installed. Some of the lab’s computers are equipped with more specialized programs and equipment, such as Adobe PhotoShop and Matlab, scanners and headphones. You can find *a list of standard equipment and specialized equipment of the computer labs on the intranet on the IT Administration’s page.
Wireless Networks
There are free wireless networks at the campus. The most important ones are Eduroam, Utapac, and Roam.fi. The signal strength varies depending on your location but is mostly strong. Sometimes you may have to repeat the login process to establish a connection.
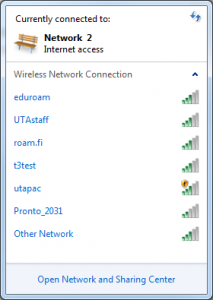
Eduroam is a protected, international network visitor service that nearly all Finnish universities and higher education institutes provide. In other words, you can login to Eduroam wherever it is provided using the login information of your home organization, which is the University of Tampere. Log in by using your tuni ID [first name.last name]@tuni.fi as your username and the password. Eduroam is the network primarily recommended by the IT Administration.
Utapac is an open wireless network that can be used to browse the University’s sites without having to log in. To access other sites, the user must log in via the browser using either their tuni ID and password or a separately granted visitor ID.
Roam.fi is an encrypted wireless network maintained by the Finnish Centre for Open Systems and Solutions, COSS ry. Log in with the user name [first name.last name]@tuni.fi and the password.
Please find more specific descriptions of the networks and instructions for login at the IT Administration’s site.
The University Library
Tampere University Library provides borrowing of physical books as well as an extensive selection of electronic databases, a search engine and an extensive dictionary. The library provides also a wide selection of guides for data acquisition and database and search engine use.The course ‘Information search training‘ (1 ECTS), introduces the library services and the basics of data acquisition.
On the Introduction to Computing –course we will use and study many of the services provided by the IT Administration and the Library, but not all of them. Course specific instructions on the premises, services and schedules can be found in the Lecture notes (link below).
2. Information Security and Data Protection at the University
The IT Administration is the foremost expert on information security at the University of Tampere but the responsibility of information security falls on everyone who uses the organization’s services – the students and the university personnel. Good information security practices are universal and observing them will be useful in a work environment as well as in your spare time.
The students’ most important tasks are to protect the user account information, sensible email practices and up-to-date protection of your personal computer. University email accounts receive plenty of deceitful emails aiming to harm or obtain personal account information. Most of these are caught by the spam filters but at times some manage their way through to students’ and university personnel’s emails. If you suspect your information security might be compromised, contact the IT Administration by email at it-helpdesk@uta.fi. Changing the password of the account that you suspect that may have been compromised may help with the damage control.
Students, who get the university user account should read the Student Information Security Guide. The guide it self is not long either (8 pages), but there is also a brief quick guide to information securiity, which is short and contains the most important things you must know.
Lecture Notes: (pdf) in Finnish only
Privacy protection is a basic right that guarantees that your personal data is protected in both state and privately run registers. The new privacy protection regulation, GDPR (General Data Protection Regulation), came into effect on the 25th of May 2018, and it unified the different privacy policies across the EU and extended the privacy protection law to cover all services that gather and store personal data. Personal data means information that can be used to identify an individual, e.g. full name, social security number, address or email address, license plate, phone number, etc.
The new regulation requires an organization to handle personal data appropriately, transparently and in accordance to the law. In many ways it is similar to the old practices and the previous legislation but it also guarantees the individual’s right to, for example:
- know what personal information an organization has of him
- know how his personal data is processed and for what purpose
- request rectification of inaccurate or incomplete personal data
- request deletion of personal data
- request restrictions of the processing of his personal data and
- transfer his personal data to another organization
It should be noted that despite a request of an individual, an organization does not have to delete data that is being stored in accordance to the law. The legal requirements are usually met, for example, if there is a valid service agreement between the organization and the individual.
In the academic world, data protection issues affect the students and the university personnel from the data collector’s perspective as well. Often, a research is done by collecting data from natural persons. During the process personal data may be stored. In this case, the subjects should be informed at the beginning of the research what kind of data is being collected, where it is stored securely and for how long, and for what purpose.
Read more about data protection on the University’s intranet site.
Information security course (IT Management is building the course, will hopefully be available at some point this autumn)
3. Computers and Operating Systems
These days, any device or part of a device which processes digital (finite) data according to its programming could be called a computer. Computers in everyday-use include not only desktops, laptops and tablets but also game consoles and smartphones. The key components of the hardware are central processor unit (CPU), graphics processing unit (GPU), random access memory (RAM) and mass memory(memory, mass memory, disk space).To put it simply, the central processor determines how quickly tasks can be completed, RAM determines how large tasks can be taken up for processing and the GPU determines how smooth and nice the result appears to the user. Mass memory (disk space) is responsible for storing data even when the power is turned off. Hard disk drives, flash memory, memory sticks and combat disks are forms of mass storage that handle local data. Cloud storage is another form of mass storage. It can be accessed on multiple different devices via user ID and password.
From the user’s point of view, the software is more relevant than the hardware since the software defines which tasks can be run. The software’s essential part is the operating system (OS). The software, in particular, is an operating system that requires some time to be able to use properly. With an operating system the user controls the hardware, file system and applications such as Word or Photoshop. Applications are usually developed separately for a specific operating system so they follow similar symbol selections, menu structures and hot keys. Currently, the most popular operating systems are Microsoft Windows 10 and macOS High Sierra by Apple for desktops and laptops and Android Nougat, Marshmallow by Google and iOS 11 by Apple for mobile devices. Next, three things related to user interfaces and studying skills will be briefly introduced: windowing, hot keys and file management.
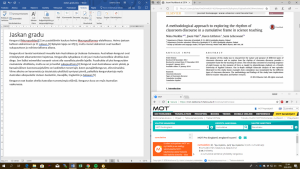
Almost all consumer interfaces – as all the ones listed above– are based on the idea of windows running different programs. Often you need to use multiple programs repeatedly to work. The windows can be arranged so that multiple programs are visible simultaneously – as the text processor, source material and dictionary have been arranged in the picture below. You can arrange windows not only using the mouse but also the keyboard, as we will discover in the next paragraph.
Hot keys or keyboard shortcuts are operating system shortcuts for executing a command. They are very useful for efficient working and even though there is no official standard, many hot keys have become well established to and work the same way in different programs. The most important Windows hot keys are:
- Ctrl+A (command ‘select all’)
- Ctrl+C (‘copy’)
- Ctrl+V (‘paste’)
- Ctrl+X (‘cut’)
- Ctrl+Z (‘undo’) and Ctrl+Y (‘redo’)
More hot keys can be found on Microsoft’s support site. In Apple’s macOS operating systems the Ctrl key is replaced by the ⌘ key. Otherwise they are all the same. More Apple shortcuts can be found on their support website.
There are a few ground rules when it comes to efficient and secure file management. The first has to do with naming files. Unless there are specific rules the naming a file (as in the course assignments), the name should be descriptive, concise, unique and consistent. This way, the content of the file is easy to guess without opening it. The file can be found by the search functions and moving it won’t cause title conflict. For example, don’t name a file Document1.docx but instead, name it as 180820-IFBB-contestresults.docx. If there are a large number of files that have dates in their names, YYMMDD should be preferred so that the files will be chronologically organized. Avoid spaces when naming a file because not all programs and applications recognize them and they will cause problems when shared in a link form. The link will often cut off where the space is.
The second rule relates to storage location – organize associated files in their own logically named folders. By storing personal files on a cloud storage service (such as OneDrive) you can simultaneously secure your data with a password and make a back up copy.
The third rule relates to the data management’s basic functions of the user interface. These include navigating the file system, sorting files and searching for files (hot key Ctrl+F for Windows and ⌘-F for macOS).
Although the course is beginners’ course, the very basics of computers and operating systems aren’t covered in the course material. If you feel you are completely new to Windows or Mac, you may find the instructions below helpful. In the following videos Dane Hartman introduces the basics of file management for Windows 7 and macOS:
- part 1 (4 min; folders, file names, file extensions),
- part 2 (10 min; organizing files),
- part 3 (8 min; moving and copying files)
- part 4 (7 min; compressing files)
4. Moodle
Moodle is a web-based learning platform widely used by the university to share course material, host forums and submit exercises. Therefore, it is essential to manage Moodle. Other Finnish institutes of higher education use Moodle as well. If necessary, the student can log into the Moodle platform of other higher education institutes with his user ID (aka HAKA login). The same way, one can log into the Moodle platform of the University of Tampere with the user name of other institutes such as TAMK, TUT or University of Oulu.
Getting Started
The link to Moodle can be found on the university’s front page or the online Student’s Desktop. The direct web address to moodle is https://learning2.uta.fi/?lang=en. There’s a link to the course’s Moodle page on the front page of the site. Use your basic user ID and password. The front page of Moodle looks like the picture below.
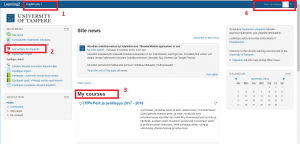
There are three ways to join courses in Moodle platform. First, the teacher can automatically add students to the course area. In this case, the course will be in “My courses” on the front page. Second, the student can directly join a course that doesn’t require a course key. Third, the student can join the course with the key given by the teacher – as in this course and the student security course. The latter method is the most common at the University.
Basic Functions
The Moodle course pages are run by the course teachers. Therefore, the design and content of the pages naturally vary between courses. The basic structure however, is almost always follows the same pattern: the functions pertaining to navigation and settings appear on the left, the actual contents of the course in the middle and the search function and the list of the latest announcements on the right.
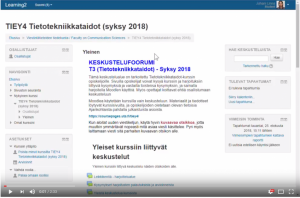
The Moodle course pages are mainly used for three purposes: Sharing different types of material (documents, videos, links), discussions, and submitting exercises. The instructions can be found on the front page of Moodle. In the video below, which is a Finnish version of Moodle, you can see how to add, edit and reply to a message in a discussion forum. The video also shows how to upload two different types of files – pictures and PDF files – to your message.
Moodle and Introduction to Computing
Moodle platform is used for discussions during the Introduction to Computing course. Questions that don’t pertain to personal matters should be asked in Moodle under an appropriate thread heading – for example, questions about assignment 2 should be asked in the column for exercise 2. If your question has to do with more than one topic, post it under a column for one of them. What matters is that you get the answer you’re looking for.
5. Office 365
Office 365 is a browser-based set of office applications. It includes Outlook email, OneDrive cloud file storage, OneNote notepad, a calendar, light versions of the word processing program Word, Excel spreadsheet and PowerPoint presentation graphics. In addition, Office 365 includes, for example, the contact information of the organization members. Because of the Office 365 applications being stored in a cloud, a Microsoft -managed network drive, you can access them from anywhere and when ever as long as you have a browser and a working internet connection.
Solutions as Office 365 are deployed across organizations, particularly to ensure that the internal functions in one’s organization – document editing and management, calendar functions and communications – are as compatible as possible. It also helps the IT support to be more efficient. Moderate use of Office 365 is a must for University of Tampere personnel and students.
Click on the link University’s front page to get to the Office 365 log in page. It can be found in the drop-down menu in the top right corner of the page. The other option is to use the address outlook.com/tuni.fi. On the login page the user account should be first name.last name@tuni.fi. The password is the password associated with your account.
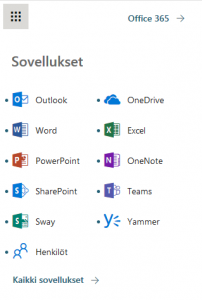
After a successful login the first one to open is Outlook email, which for many is probably the most used application. In all cases, links to other Office 365 applications can be accessed via the so-called ‘waffle menu’ icon (see the picture on the right). Many applications at the University of Tampere have very little use and therefore won’t be practiced during the course. Those are, for example, Delve, Planner and PowerApps. However, there’s no harm exploring them on your own if you wish. In fact, they might be even useful to you.
In terms of office software, it is good to understand the difference between browser versions and desktop versions. Both will be used during the course. All Office 365 applications are browser versions, with the advantage that they can be accessed anywhere where there’s a computer with a browser. The disadvantage is that due to browser limitations, their functionality is more limited than desktop versions such as Word 2016 and Excel 2016 in computer labs and Office Pro Plus which is free to students. Theme 1 exercises can be done with browser versions but Themes 2 and 3 require desktop versions.
Office 365 can be used quite well on mobile browsers as well. However, it is recommended to download the software of each application for mobile use. They are available for both Android and iOS devices.
Outlook email
All new students receive an email linked to Office 365 and 50 GB of storage space. You should memorize your email address – it’s in the following form:
- firstname.lastname@tuni.fi
Students are required to be up-to-date with their tuni.fi email. Study and course emails are sent to this – and only this – address to ensure the recipient’s identity. If you wish, you can forward the emails to another email application (settings wheel icon / Email / Accounts / Forwarding). However, most teachers require that students reply to emails using their tuni.fi account for the sake of privacy protection. University email security is reasonably good but one shouldn’t share his email address -unless necessary- to avoid ending up in spam lists. The account password should be kept to yourself only.
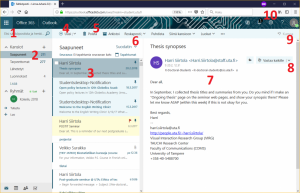
In the picture above you can see the main view of Outlook email. The picture shows
- The waffle menu icon revealing a selection of applications and search bar below it (number 1)
- Folder menu – in the picture the inbox is selected (2)
- Inbox (3)
- Creating a new email (4)
- Deleting a selected message (5) – in this case, by selecting Delete, Harri’s email would be moved into the recycle bin
- Inbox filtering menu which lets you specify which messages are displayed and in which order (6)
- Contents of a selected message (7) or the editing box, depending on whether you are reading a received email or writing a new one
- Reply function (8)
- Undoing the latest action (9) – however, all actions can’t be undone
- Settings menu (10) provides access to settings related to account, layout, and message processing. Instructions menu is next to it.
Email use is an essential part of studies and work, therefore it is worth investing a little in its efficient and secure use. Many of the basic principles such as threads and message filtering are similar in other communication applications. Up-to-date instructions can be found in the instructions menu. Some of the basics are explained below.
Settings can be adjusted via the gear menu’ (the gear icon / Email). There are many settings and they can be browsed through the menu on the left or searched for a matching one in the search box. In the settings you can configure, for example, inbound forwarding, auto-absence, and custom filtering policies, as well as check the inbox usage in your account. In addition, you can adjust many aspects of Outlook appearance and layout, starting with the color.
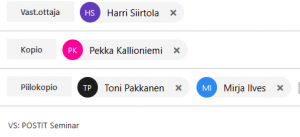
Compose a message is in the right column (either by clicking the ‘reply’ button or by selecting New for a new message). If you have set yourself an automatic signature in the settings, it should appear at the bottom of the message box. Enter the addresses of the recipients to whom you want to send the message in the Copy (cc = carbon copy) and the Bcc (blind carbon copy) fields. The copy field address (cc) is visible to recipients but the hidden copy (bcc) field is not. In practice, ‘To’ field id used to enter the person’s email address expected to response, while the recipients of the ‘Cc’ and ‘Bcc’ fields are not normally required to respond. The recipient of the Bcc field won’t be visible to the other recipients of the message.
Creating new folders and applying filter rules.
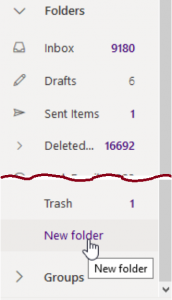 In Outlook, messages can be simply dragged and dropped into your own folders. It is also possible to just automatically direct messages to a specific folder – for example, messages regarding a specific project or newsletters a specific subject can be automatically collected into their own folders.
If I want to filter the emails that I sent to myself in the ‘Archive‘ folder, I will first create that folder by pressing New Folder button at the bottom of the Folders area. Then I will add a new inbox rule in the settings, which will move the mails I send to myself.
Defining the rule could look something like the picture below (Setting a new rule).(1) The name of the rule is Archiving, it is valid for messages (2) sent (Lähettäjä) from Auilkki Hyrskykari (myself), and it will automatically (3) move (Siirrä kansioon) these messages to Archive – they won’t appear in the Inbox. (4) Checking the box Stop handling the rules (Lopeta sääntöjen käsitteleminen)
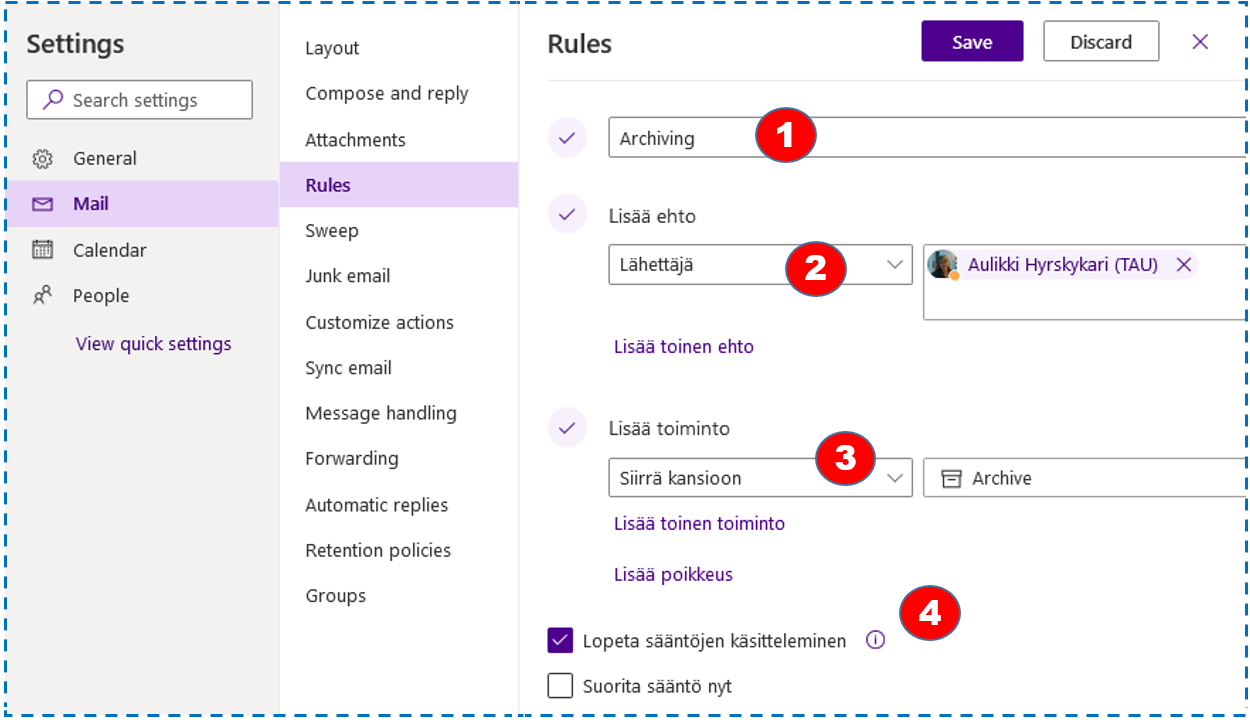
Multiple conditions can be added to the same rule (Lisää toinen ehto = add another condition).
Filtering rules can be useful in some situations but you should be cautious when creating them. It is easy to forget created filtering rules and if you have set messages from a particular sender to go automatically to another folder, you may forget to check what is actually gone into the folder.
Microsoft’s instructions for Outlook
Training videos
OneDrive cloud storage
Another widely used Office 365 program is the OneDrive cloud strorage service with 25 GB storage space. OneDrive is simply a storage space on a network disc for a student’s own files. The disc contents are regularly backed up by Microsoft. Although the exact location of the files aren’t revealed to the users, OneDrive can be said to be a much safer and, in most cases, more usable option for storing files. It is also convenient for sharing files and folders and for group projects.
Newer Microsoft Office 365 programs (both browser and desktop versions) can be saved directly to OneDrive. With the Office Pro Plus you also get a OneDrive icon on your home computer’s desktop. It allows you a direct access to content without a browser. This feature is not available in the computer labs.
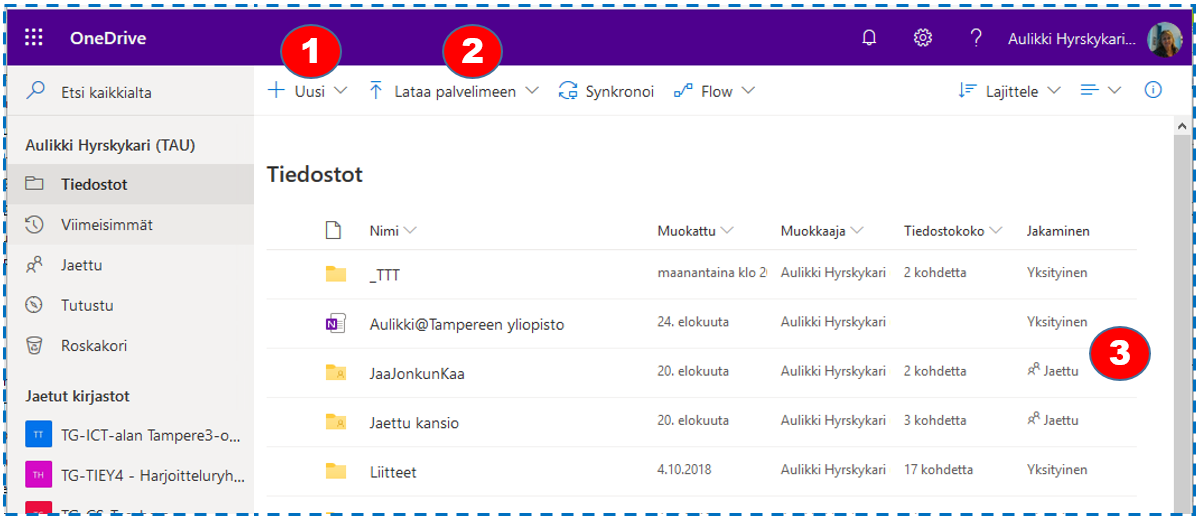
Sharing files and folders is one of OneDrive’s core functions. Managing it is a basic skill. There are two main ways to share both folders and files – by granting rights to certain people or by sharing a link. The most suitable way for sharing depends on the purpose. For example, it is best to share a folder containing project material for a group project with other university students by inviting. In the picture below, Juhani shares a project folder with Anniina by first clicking the folder’s shared status (see picture above) and then Grant Access. Anniina’s contact information can be found by name search. At the same time, multiple users can be added. Note that there are two levels of access rights – viewing rights and editing rights. People who can only view the file cannot edit it even though they can view it. People you have shared content with can access it via their own OneDrive by selecting Shared with me.
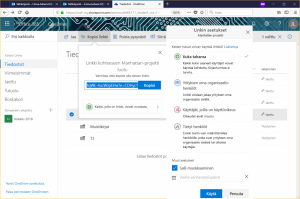
Another main way to share files is link sharing. When a file or folder is selected you can see the Copy link function. If you click on it, OneDrive will create a link that by sharing it you can grant editing/view rights (picture below). In the link’s settings you can specify the extent of link access and, if you wish, set an expiration date, after which the link will no longer work. By selecting More details you can check how different settings affect sharing. By selecting Copy the link is saved to the clipboard, where, for example, it can be pasted into an e-mail. (shortcut Ctrl+V on Windows and ⌘+V on Mac).
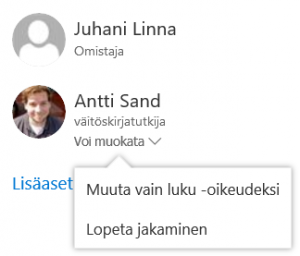 Undoing sharing is as important a skill as sharing. Undoing sharing is done the same wasy as when adding people. You can cancel a person’s access rights by choosing Stop sharing (Lopeta jakaminen) in the access rights menu (picture to the right), and unlink by unchecking the link [x] next to it.
There are three things to remember when sharing by link. First of all, with any available link, it is good to keep in mind that the file indicated by the link indeed is accessible to anyone who has access to the link – it can be copied and forwarded. Secondly, because the links need to be unique they are often quite long and can get cut off when emailing or copied by hand. Try copying the following link: https://utafi-my.sharepoint.com/:f:/g/personal/kl66171_student_uta_fi1/Epz8nJpEckBAnpjWyTwYL-UB6Eft1uRHtqWE-4ucWJpEHw . If the link you received doesn’t seem to work, see if it has been copied completely. Thirdly, you should remember that links from unknown sources or suspicious links should not be clicked.
Individual files can also be shared directly in Office 365. The topic will be revisited in the Team work chapter.
Microsoft’s instructions for OneDrive
OneNote Online Notebook
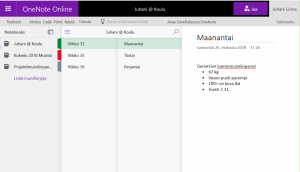
OneNote is a version of Microsoft’s notebook. Evernote is probably the most famous one. OneNote aims to be a type of electronic notepad with almost unlimited storage space. Notes are first organized into notebooks and further into sections and pages that can be named and colour coded (see picture). Notebooks can be shared, for example, in projects.
OneNote has a number of note-taking features to ease one’s life such as automatic dates, to-do list prioritization, and syncronization with the calendar. The menu structures and functions are very similar to other Office 365 programs such as Word. In addition, OneNote supports drawing. The desktop version can recognize hand-written text with moderate accuracy – this feature is reasonably available if you use a touch screen and a stylus pen.
Microsoft’s instructions for OneNote Online
Word, Excel and PowerPoint online
Office 365 offers relatively advanced browser versions (also called online versions) of the most familiar Office programs: text processor Word, spreadsheet Excel and PowerPoint presentation graphics. Browser versions look the same as the desktop versions and they function quite similarly. If you open Word, Excel or PowerPoint files in OneDrive with a browser they open primarily browser versions. This is useful when you just want to view a document or make small changes to it.
For more demanding work it is recommended to use desktop versions that are more versatile and stable than browser versions.
Microsoft’s instructions for:
Word Online
Excel Online
PowerPoint Online
Sway
Sway is a browser-based presentation graphics program and actually an alternative to PowerPoint, especially when it comes to making and sharing fairly simple presentations quickly. Sway can also convert – with varying degrees of success – existing PowerPoint presentations into Sway presentations. However, it does not contain nearly as wide a range of functions as its role model.
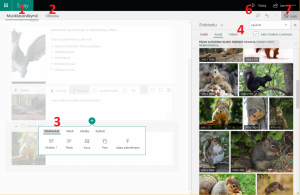
An example of a Sway presentation (presentation in Finnish)
Microsoft’s instructions for Sway
Calendar
In addition to tagging your own meetings and other events, you can also share them with other users and track events shared by others. You can also send a link to a web conference. In addition, at the University of Tampere, some room reservations, such as student teamwork rooms, are handled through the Office 365 calendar application. The teamwork rooms have their own booking calendar which makes it easier to check their booking status. The free/busy status of your calendar is visible to all university students but the details won’t be visible to others unless you provide other users with more detailed information. So if you haven’t made any notes you will appear ‘free’.
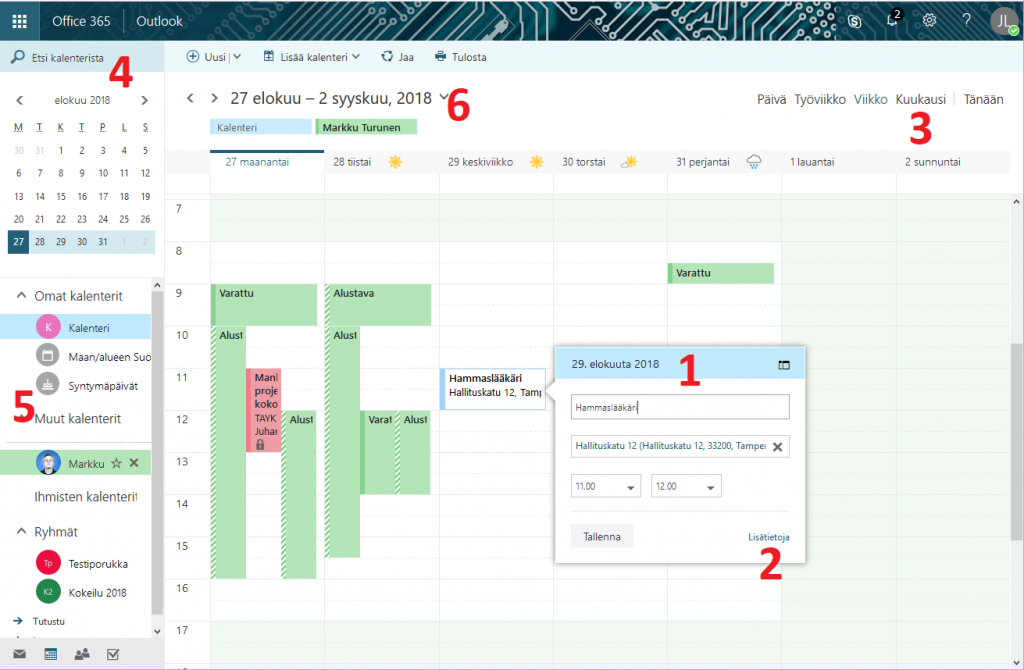
The more people within an organization use the calendar, the more useful it is. For example, wasting unnecessary time to find a suitable time for a meeting could be completely avoided if everyone in the meeting group used the Office 365 calendar. The meeting time reminders and web meeting attendance links would be automatically created when creating meetings. In practice, however, calendar policies are still patchy – many use paper calendars or electronic calendar applications.
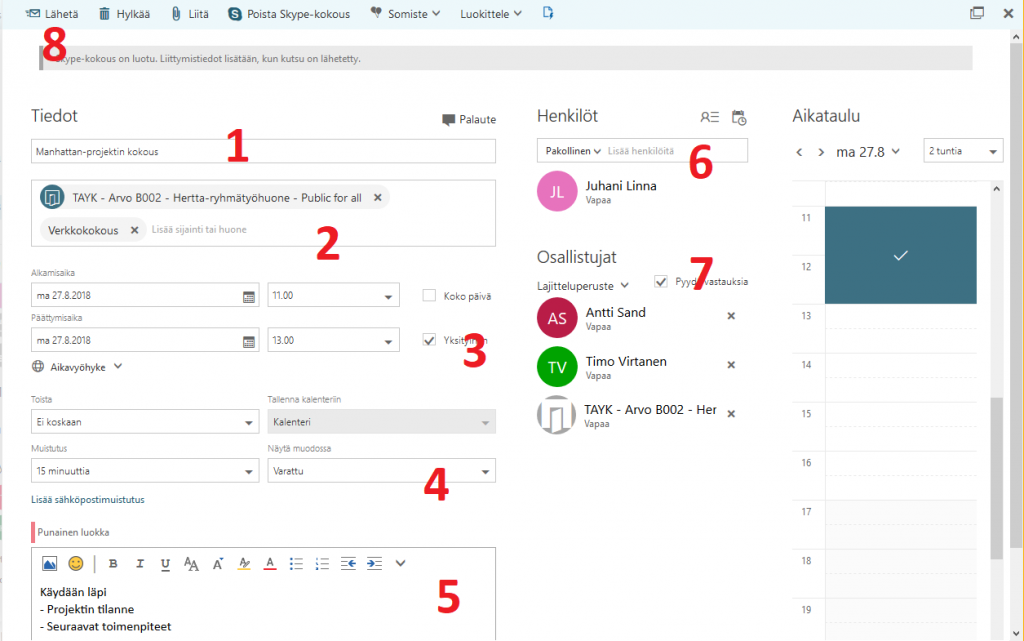
Microsoft’s Calendar instructions
Lecture Notes:
Assignment 1: Office 365 I (pdf)
Assignment 2: Office 365 II (pdf)
6. Data Management in a Team
In studies and work life, there are often situations where purposeful activity is done through teamwork. Teamwork can be short-term, such as working on a project or course work, or longer-term, such as working in a team or subject association. Computer assisted teamwork emphasizes not only program management but also access, version control and communication.
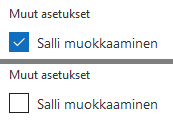 Access rights determine who has access to specific documents and to what extent. In the University’s Office 365 environment you can grant access to everyone (with a link), all members of your organization, or certain designated users. There are two types of access rights. The “lighter” rights comprise reading, observing or viewing rights. All these terms mean that the user can access the file and is usually also able to download a copy of it to his device but can’t edit the content of the original document. The more extensive access rights grant editing rights in addition to the previous three. In Office 365 the choice between the two is usually made by selecting Allow editing or unchecking the box (picture on the right).
In Office 365, users can also redistribute the access rights they receive but if they conflict with the original rights (defined by the owner of the file being shared), the original rights prevail. So, for example, if you have granted editing rights to all members of your organization and only to them, other users can’t grant editing rights to people outside your organization.
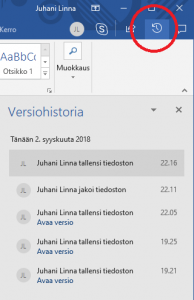 Version control refers to the ability to return to previous versions of the same document – its synonym in Office is version history. In case of teamwork, it is sometimes necessary to revert to a previous version of a document due to failed editing attempts, or to look at who who edited the file and when. Both Office online and desktop versions have access to version history clicking the clock icon in the upper right corner (if the icon is not visible, write version history to the”tell-what-you-want-to-do” help field ) (picture on the left). Version history is listed chronologically and you can view – and save if necessary – by clicking on them.
Communication refers here to communication related to the document being edited between group members. There are, of course, many choices – most popular are the WhatsApp and Messenger groups – of which are presented here the ones integrated with Office applications. Chats are a good option for real time communication. The chat appears active when more than one concurrent editor is present. You’ll be informed of other editors in the top right corner (number 1 in the picture below). You can open the chat in the blue bubble icon (2). Chats can be useful but it’s good to know that the conversations it contains aren’t saved. In addition, it may perform poorly between desktop and browser versions –  desktop version users may need to use Skype for Business to chat. If you want to make a permanent note regarding the document, it is recommended to use the comment function (3).
In this course we focus on technical aspects, although of course successful teamwork requires more than just technical management. In Office 365 group tech support is available in many ways, which makes the whole thing a bit confusing. As we learned in the previous chapter, OneDrive folders can be shared with different types of access rights. You can also share individual files the same way. For more advanced teamwork there are tools such as Groups and Teams as well as the SharePoint service, which allows you to create whole customized sites for groups.
Working on a Document in a Team
In teamwork it is often more convenient to create and share a folder so that the contents of the folder are accessible to all team members. It is common that more source material will be available as you work and adding them to a shared folder makes them automatically available to anyone to whom the folder is shared. Sharing each document individually is, of course, technically possible but it is needlessly laborious, prone to errors, and provides an entity difficult to manage.
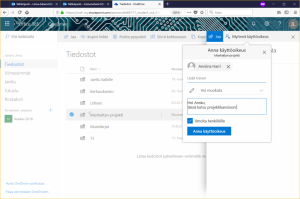
All in all, working on a single document in a group is sometimes justified. It can be done, both in Office 365’s online and Office desktop versions via Word, Excel, PowerPoint, and OneNote via share-button. To share a document successfully with editing rights the document has to be saved in the OneDrive cloud. If not, the program prompts you to do so – otherwise the only option is to share a copy of the document via email (picture on the right). Note that sharing via an application (like Word or Excel) produces the same result as sharing via OneDrive, and the file sharing settings on OneDrive are consistent with the settings you make in the application.
If the document is saved in the University of Tampere OneDrive disk, the share button gives the same options as sharing via OneDrive (picture below).
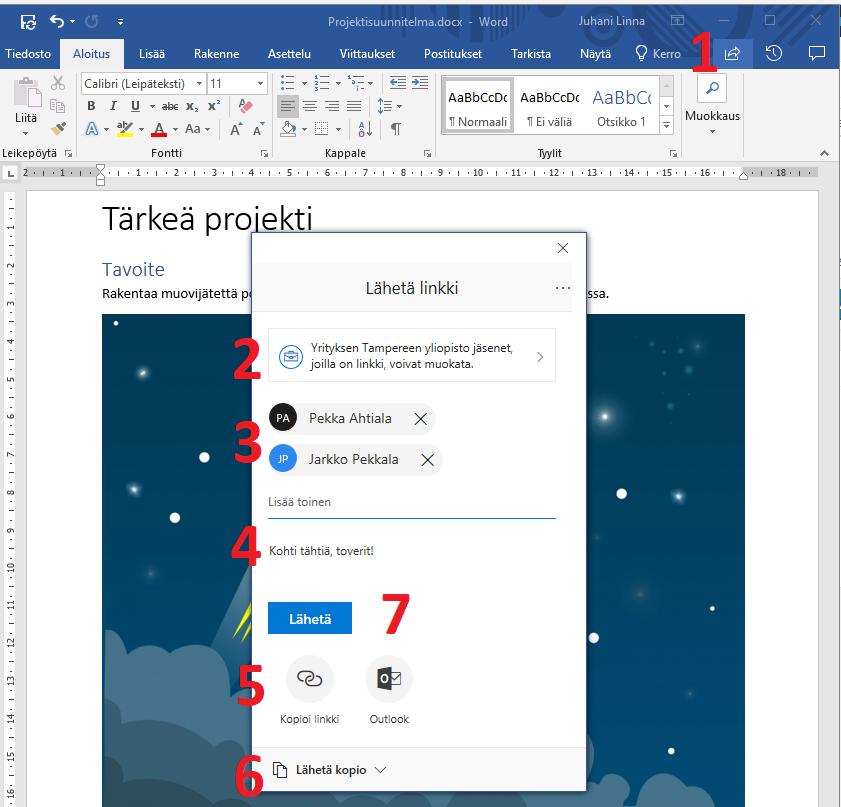
The share button in Office programs is located near the top right corner (number 1 in the picture). In the opening window you can select the extent of the access rights (2) or you can search for specific people individually in the university address search (3). These people will see the document on their OneDrive in the folder Shared with Me. Note that only the files you make available to the members of the organization you name will appear as files available on their OneDrive see the files you shared on their OneDrive – in this case the files will be on Pekka’s and Jarkko’s OneDrives. Others need a link.
You can send the people you named a message (4) to inform of a shared document. This is wise. The link can be copied to the clipboard (5). You can add a copy of the document to the message (6). Select Send to send the message.
Groups
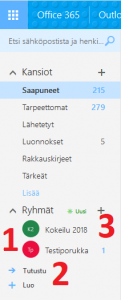 Office 365 Groups is one of the simplest way to create a group. Groups have shared resources such as shared email, file folder, calendar, and notebook. This means that group members don’t need to be explicitly assigned rights to group events, events, messages or files but in principle, all group content is accessible to group members instead. You can also create customized sites for the group in SharePoint.
Groups don’t have their own application but are created and administrated in Outlook. Under ‘Groups’ you can see all the groups you belong to or have browsed – The picture on the right displays (1) groups Kokeilu 2018 and Testiporukka. You can browse existing groups by selecting ‘Discover’ (2). All groups, even private ones, are publicly displayed within the organization. Therefore, there are hundreds of groups to browse and are mostly uninteresting to individual users. You can create a new group by clicking on the plus sign (3).
Creating a group is straightforward. After selecting ‘Create’, select which type of group you want (standard group), and then the name (number 1 in the picture below) and email address of the group (2). You can type a group description (3). Group’s content can be made public in privacy settings (4) – meaning, all university members can see it – or private, in other words, only visible to group members. In most cases the latter option is the better one.
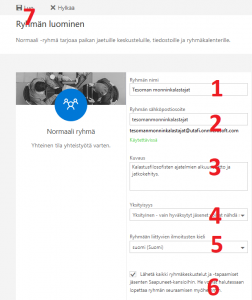 When creating a group you can select the language for group-related notifications (5). You can select/deselect all group conversations and events to be sent to members’ inboxes as well (6). To create a group select Create’(7).
Once you’ve created a group you can add users to the group. Search users by name in the university’s database. Adding a person doesn’t require their consent, but they can leave the group if they wish. The creator of the group can also delete the group. Members can be added afterwards as well and people browsing groups may ask to join private groups.
The groups site’s main tabs are Conversations, Files, Calendar and Notepad. The ‘Conversations’ tab displays messages sent to the group’s e-mail address. The ‘Files’ tab shows the files shared by the group and the ‘Calendar’ tab shows the calendar entries. In Office 365 calendar entries are tied to an email address, here a group email address. Group members can set the entries visible in their personal calendar. The notebook is accessed through the OneNote application.
Microsoft’s Group instructions
Teams
Teams is an application similar to Groups. Even Microsoft can’t properly explain the differences between these two, and in parallel use, it is possible to cause more confusion than order, especially if groups and teams share same members. However, it is conceivable that Teams is much broader and more versatile and may be designed more for long-term use and more members. A team is always a group (either new or based on an existing one) but not the other way round.
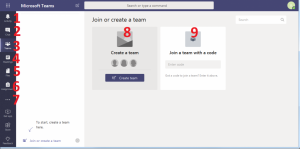
The Teams interface is similar to the one above. Notifications of recent events can be found in the navigation bar on the left (number 1 in the picture), a chat box that allows you to have discussions (2), Teams menu where you see all your teams (3), scheduled calendar events (4), user files (5) and tasks (6), a tool for educational organizations but is not yet used at the University of Tampere. More functions can be found in the horizontal “dots menu” (7). To create a new Team select Create a Team (8) or join an existing Team with a code (9). Once created members can be added the same way as Groups.
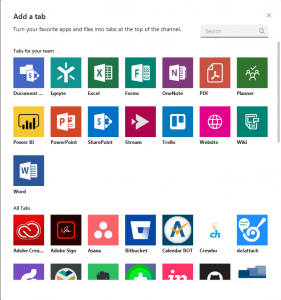
A user can belong to multiple Teams, that are managed and accessed via the Teams menu. Each team has its own channel to which various resources can be added: chats, files and applications. The latter is perhaps the most significant difference between Teams and Groups: Teams allows the addition of many applications outside Office 365 (picture on the left). For example Trello, Abode Creative Cloud, GitHub and EverNote are among the applications to add.
Microsoft’s instructions for Teams
SharePoint
You can use SharePoint to create a personalized group site for your group, or, for example, a file site for a project. SharePoint is not covered in this course.
Microsoft’s SharePoint instructions
7. Compressing Data
Compressing information, data and files simply means compressing them into a smaller space. Different techniques are used for compression. Since data is transmitted from one place to another within a computer and via networks, size is of great importance for efficiency.
Compressing is done both automatically and at the user’s request. For example, most media file formats such as .jpeg and .png for pictures, .mp3 for audio, and .mp4 for video – compress data automatically without the user noticing it – the fact that the media files are in compressed format has no effect on their everyday use. User-initiated compression is done either with program built into the OS (operating system) or with separately downloadable program. The most common file format is .zip and colloquially refers to zip packages as a reference to a compressed file package, and zipping with a reference to compressing. Other file formats for compressed files include .rar, .jar, and .arj. Files in these formats must be extracted in order for their contents to be accessible.
Compressing and extracting data is important to know, not only to save space but also because some programs (such as OneDrive Online) sometimes compress files without asking the user to zip them. Furthermore, compressed files can be password protected, which can be sometimes useful.
Compressing and Extracting
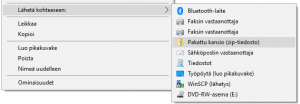 In Windows operating systems compressing is done by simply selecting the subject (file or folder) or subjects, right-clicking to open the drop-down menu and selecting Send to: Compressed (zipped) folder (see picture). Extracting is done the same way: Click the file or folder and select one of the Extract commands. If you have installed one of the many compression programs available on your computer, the steps are the same but the menus are a bit more advanced.
In MacOS, select Compress in the drop-down menu after selecting the file and double-click the compressed file to extract it.
Microsoft’s instructions for compressing and extracting
Apple’s instructions for compressing and extracting
Assignment 3: Teamwork (pdf)